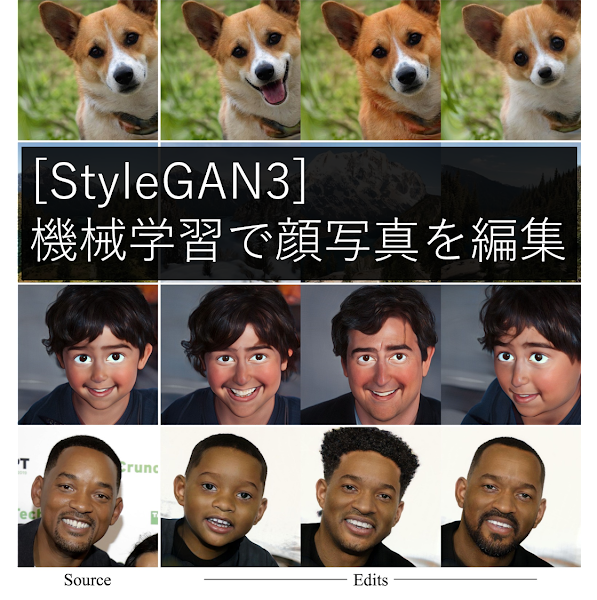
本記事では、StyleGAN3を使用して、顔写真を編集する方法をご紹介します。
StyleGAN3
概要
StyleGAN,
StyleGAN2,
StyleGAN3と脈々と改善が繰り返されるGANを用いた画像生成技術です。
StyleGANの発表当初、本物の写真と判別ができないほどの高精細な画像が生成されることに衝撃を覚えました。
その後画像品質の向上、学習速度の向上など様々な改善に取り組み2021年にはStyleGAN3が発表されています。
今回は、2022年1月末に発表されたStyleGAN3の関連論文を参考に顔写真を編集してみます。
デモ(Colaboratory)
それでは、実際に動かしながらStyleGAN3を用いた顔写真の編集を行っていきます。
ソースコードは本記事にも記載していますが、下記のGitHubでも取得可能です。
GitHub - Colaboratory demo
また、下記から直接Google Colaboratoryで開くこともできます。

なお、このデモはPythonで実装しています。
Pythonの実装に不安がある方、Pythonを使った機械学習について詳しく勉強したい方は、以下の書籍やオンライン講座などがおすすめです。
環境セットアップ
それではセットアップしていきます。
Colaboratoryを開いたら下記を設定しGPUを使用するようにしてください。
「ランタイムのタイプを変更」→「ハードウェアアクセラレータ」をGPUに変更
まず、GitHubからソースコードを取得します。
import os
from pathlib import Path

%cd /content

CODE_DIR = 'stylegan3-editing'
!git clone https://github.com/yuval-alaluf/stylegan3-editing
次にライブラリをインストールします
!wget https://github.com/ninja-build/ninja/releases/download/v1.8.2/ninja-linux.zip
!sudo unzip ninja-linux.zip -d /usr/local/bin/
!sudo update-alternatives --install /usr/bin/ninja ninja /usr/local/bin/ninja 1 --force

!pip install pyrallis
!pip install git+https://github.com/openai/CLIP.git
使用するライブラリをインポートします。
%cd /content/{CODE_DIR}

import time
import sys
import pprint
import numpy as np
from PIL import Image
import dataclasses
import torch
import torchvision.transforms as transforms

sys.path.append(".")
sys.path.append("..")

from editing.interfacegan.face_editor import FaceEditor
from editing.styleclip_global_directions import edit as styleclip_edit
from models.stylegan3.model import GeneratorType
from notebooks.notebook_utils import Downloader, ENCODER_PATHS, INTERFACEGAN_PATHS, STYLECLIP_PATHS
from notebooks.notebook_utils import run_alignment, crop_image, compute_transforms
from utils.common import tensor2im
from utils.inference_utils import run_on_batch, load_encoder, get_average_image

%load_ext autoreload
%autoreload 2
学習済みモデルのセットアップ
続いて論文発表元が公開する学習済みモデルをセットアップしていきます。
download_with_pydrive = False #@param {type:"boolean"}
downloader = Downloader(code_dir=CODE_DIR,
                        use_pydrive=download_with_pydrive,
                        subdir="pretrained_models")

#@markdown 学習済みモデルの選択
experiment_type = 'restyle_pSp_ffhq' #@param ['restyle_e4e_ffhq', 'restyle_pSp_ffhq']
推論時のパラメータを設定します。
EXPERIMENT_DATA_ARGS = {
    "restyle_pSp_ffhq": {
        "model_path": "./pretrained_models/restyle_pSp_ffhq.pt",
        "image_path": "./notebooks/images/face_image.jpg",
        "transform": transforms.Compose([
            transforms.Resize((256, 256)),
            transforms.ToTensor(),
            transforms.Normalize([0.5, 0.5, 0.5], [0.5, 0.5, 0.5])])
    },
    "restyle_e4e_ffhq": {
        "model_path": "./pretrained_models/restyle_e4e_ffhq.pt",
        "image_path": "./notebooks/images/face_image.jpg",
        "transform": transforms.Compose([
            transforms.Resize((256, 256)),
            transforms.ToTensor(),
            transforms.Normalize([0.5, 0.5, 0.5], [0.5, 0.5, 0.5])])
    }
}

EXPERIMENT_ARGS = EXPERIMENT_DATA_ARGS[experiment_type]
Downloaderの設定に基づき学習済みモデルをダウンロードします。
/content/stylegan3-editing/pretrained_models/restyle_pSp_ffhq.ptがダウンロードされます。
if not os.path.exists(EXPERIMENT_ARGS['model_path']) or os.path.getsize(EXPERIMENT_ARGS['model_path']) < 1000000:
    print(f'Downloading ReStyle encoder model: {experiment_type}...')
    try:
      downloader.download_file(file_id=ENCODER_PATHS[experiment_type]['id'],
                              file_name=ENCODER_PATHS[experiment_type]['name'])
    except Exception as e:
      raise ValueError(f"Unable to download model correctly! {e}")
    # if google drive receives too many requests, we'll reach the quota limit and be unable to download the model
    if os.path.getsize(EXPERIMENT_ARGS['model_path']) < 1000000:
        raise ValueError("Pretrained model was unable to be downloaded correctly!")
    else:
        print('Done.')
else:
    print(f'Model for {experiment_type} already exists!')
ダウンロードしたモデルをロードしておきましょう。
model_path = EXPERIMENT_ARGS['model_path']
net, opts = load_encoder(checkpoint_path=model_path)
pprint.pprint(dataclasses.asdict(opts))
テスト画像のセットアップ
顔写真をWebからダウンロードします。縦・横同じサイズの画像が必要なため以下のコードでは正方形に切り抜いています。
また、極力正面を向いており両目がはっきりと映った写真を使用すると良好な結果が得られます。
不鮮明な場合この後の処理で顔のランドマークを探索する際にエラーが発生する場合があります。
本記事では、ぱくたそ様の画像を正方形に切り抜いて使用させていただきます。
%cd /content/{CODE_DIR}

!mkdir upload_images

# 画像ダウンロード
!wget -c https://user0514.cdnw.net/shared/img/thumb/kuchikomi725_TP_V4.jpg \
      -O ./upload_images/test_img.jpg

# 正方形に切り抜き
img = cv2.imread("./upload_images/test_img.jpg")
cropped_image = img[8:264, 374:630]
cv2.imwrite('./upload_images/cropped_img.jpg', cropped_image)
image_path = Path('./upload_images/cropped_img.jpg')

# repositoryの画像を使用する場合は以下
#image_path = Path(EXPERIMENT_DATA_ARGS[experiment_type]["image_path"]) # ウィル・スミス

original_image = Image.open(image_path).convert("RGB")
original_image = original_image.resize((256, 256))
original_image
セットアップした画像から顔部分をクロップします。
%cd /content/{CODE_DIR}

import dlib
from utils.alignment_utils import align_face


if not os.path.exists("./shape_predictor_68_face_landmarks.dat"):
  !wget http://dlib.net/files/shape_predictor_68_face_landmarks.dat.bz2
  !bzip2 -d shape_predictor_68_face_landmarks.dat.bz2

predictor = dlib.shape_predictor("./shape_predictor_68_face_landmarks.dat")
detector = dlib.get_frontal_face_detector()
print("Aligning image...")
input_image = align_face(filepath=str(image_path), detector=detector, predictor=predictor)

#input_image = run_alignment(image_path)
cropped_image = crop_image(image_path)
joined = np.concatenate([input_image.resize((256, 256)), cropped_image.resize((256, 256))], axis=1)
Image.fromarray(joined)
Landmarkベースのtransformを実行します。
この時顔のLandmarkが正常に取得できない場合エラーとなります。
images_dir = Path("./images")
images_dir.mkdir(exist_ok=True, parents=True)
cropped_path = images_dir / f"cropped_{image_path.name}"
aligned_path = images_dir / f"aligned_{image_path.name}"
cropped_image.save(cropped_path)
input_image.save(aligned_path)
landmarks_transform = compute_transforms(aligned_path=aligned_path, cropped_path=cropped_path)
Done!が表示されれば完了です。
Inversion
編集する際のベースとなるlatent codeを生成します。
n_iters_per_batch = 3 #@param {type:"integer"}
opts.n_iters_per_batch = n_iters_per_batch
opts.resize_outputs = False  # generate outputs at full resolution

img_transforms = EXPERIMENT_ARGS['transform']
transformed_image = img_transforms(input_image)

avg_image = get_average_image(net)

with torch.no_grad():
    tic = time.time()
    result_batch, result_latents = run_on_batch(inputs=transformed_image.unsqueeze(0).cuda().float(),
                                                net=net,
                                                opts=opts,
                                                avg_image=avg_image,
                                                landmarks_transform=torch.from_numpy(landmarks_transform).cuda().float())
    toc = time.time()
    print('Inference took {:.4f} seconds.'.format(toc - tic))

def get_coupled_results(result_batch, cropped_image):
    result_tensors = result_batch[0]  # there's one image in our batch
    resize_amount = (256, 256) if opts.resize_outputs else (opts.output_size, opts.output_size)
    final_rec = tensor2im(result_tensors[-1]).resize(resize_amount)
    input_im = cropped_image.resize(resize_amount)
    res = np.concatenate([np.array(input_im), np.array(final_rec)], axis=1)
    res = Image.fromarray(res)
    return res

res = get_coupled_results(result_batch, cropped_image)
res.resize((1024, 512))

生成された右側の画像をベースに編集していきます。
顔写真の編集
それではいよいよ顔写真を編集していきます。
初めにStyleCLIPなどをダウンロードします。
download_with_pydrive = False #@param {type:"boolean"}

# download files for interfacegan
downloader = Downloader(code_dir=CODE_DIR,
                        use_pydrive=download_with_pydrive,
                        subdir="editing/interfacegan/boundaries/ffhq")
print("Downloading InterFaceGAN boundaries...")
for editing_file, params in INTERFACEGAN_PATHS.items():
    print(f"Downloading {editing_file} boundary...")
    downloader.download_file(file_id=params['id'],
                             file_name=params['name'])

# download files for styleclip
downloader = Downloader(code_dir=CODE_DIR,
                        use_pydrive=download_with_pydrive,
                        subdir="editing/styleclip_global_directions/sg3-r-ffhq-1024")
print("Downloading StyleCLIP auxiliary files...")
for editing_file, params in STYLECLIP_PATHS.items():
    print(f"Downloading {editing_file}...")
    downloader.download_file(file_id=params['id'],
                             file_name=params['name'])
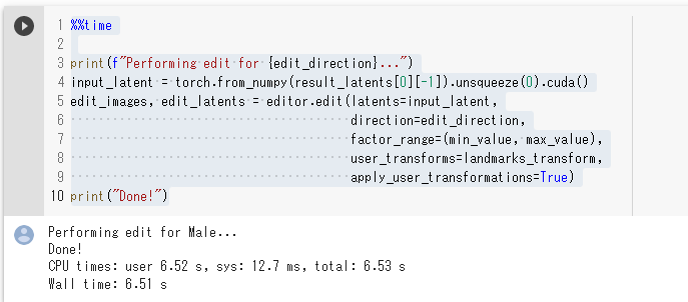
ここで、編集したいパラメータを設定します。
Maleを計10段階編集してみます。
editor = FaceEditor(stylegan_generator=net.decoder, generator_type=GeneratorType.ALIGNED)

#@markdown 編集パラメータ設定
edit_direction = 'Male' #@param ['age', 'smile', 'pose', 'Male']
min_value = -5 #@param {type:"slider", min:-10, max:10, step:1}
max_value = 5 #@param {type:"slider", min:-10, max:10, step:1}
顔写真を編集します。
%%time

print(f"Performing edit for {edit_direction}...")
input_latent = torch.from_numpy(result_latents[0][-1]).unsqueeze(0).cuda()
edit_images, edit_latents = editor.edit(latents=input_latent,
                                        direction=edit_direction,
                                        factor_range=(min_value, max_value),
                                        user_transforms=landmarks_transform,
                                        apply_user_transformations=True)
print("Done!")
およそ7秒で編集完了します。
編集結果を表示します。
def prepare_edited_result(edit_images):
  if type(edit_images[0]) == list:
      edit_images = [image[0] for image in edit_images]
  res = np.array(edit_images[0].resize((512, 512)))
  for image in edit_images[1:]:
      res = np.concatenate([res, image.resize((512, 512))], axis=1)
  res = Image.fromarray(res).convert("RGB")
  return res

res = prepare_edited_result(edit_images)
res
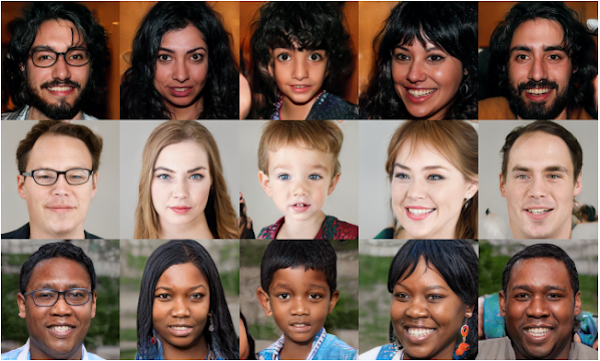
Maleの+5から-5の結果は以下の通りです。どことなく右端の男性は平井堅さんに似ていますね。
その他のパラメータも試してみましょう。
ageの結果は以下の通りです。
poseの結果は以下の通りです。
smileの結果は以下の通りです。
どれも自然な出力結果であることが確認できます。
smileの+5にて非常にきれいな歯が生成されていますね。入力した画像の人の歯並びをGANは知りえないので、歯が欠けている人などで試すと実際とは異なる歯並びの笑顔が出力されますね。逆に、GANが綺麗な歯並びの写真を生成してくれるので良いかもしれませんが。
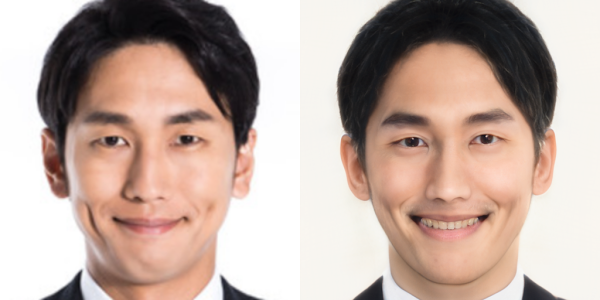
自然言語表現による顔写真の編集
StyleCLIPを使用して、自然言語表現を用いて顔写真を編集してみましょう。
本記事では、target_text = "a smiling face"を入力します。
styleclip_args = styleclip_edit.EditConfig()
global_direction_calculator = styleclip_edit.load_direction_calculator(stylegan_model=net.decoder, opts=styleclip_args)

neutral_text = "a face" #@param {type:"raw"}
target_text = "a smiling face" #@param {type:"raw"}
alpha = 4 #@param {type:"slider", min:-5, max:5, step:0.5}
beta = 0.13 #@param {type:"slider", min:-1, max:1, step:0.1}
入力テキストから画像を生成します。
%%time

opts = styleclip_edit.EditConfig()
opts.alpha_min = alpha
opts.alpha_max = alpha
opts.num_alphas = 1
opts.beta_min = beta
opts.beta_max = beta
opts.num_betas = 1
opts.neutral_text = neutral_text
opts.target_text = target_text

input_latent = result_latents[0][-1]
input_transforms = torch.from_numpy(landmarks_transform).cpu().numpy()
print(f'Performing edit for: "{opts.target_text}"...')
edit_res, edit_latent = styleclip_edit.edit_image(latent=input_latent,
                                                  landmarks_transform=input_transforms,
                                                  stylegan_model=net.decoder,
                                                  global_direction_calculator=global_direction_calculator,
                                                  opts=opts,
                                                  image_name=None,
                                                  save=False)
print("Done!")
およそ2秒で完了します。
出力結果を表示します。
input_im = tensor2im(transformed_image).resize((512, 512))
edited_im = tensor2im(edit_res[0]).resize((512, 512))
edit_coupled = np.concatenate([np.array(input_im), np.array(edited_im)], axis=1)
edit_coupled = Image.fromarray(edit_coupled)
edit_coupled.resize((1024, 512))
出力結果は以下の通りです。
CLIPが自然言語表現を理解して、笑顔が生成されていますね。
まとめ
本記事では、StyleGAN3を用いて顔写真を編集する方法をご紹介しました。
StyleGANは関連論文もサンプル実装も豊富なのでいろいろ探していくと勉強になります。
これを機に機械学習に興味を持つ方が一人でもいらっしゃいましたら幸いです。
また本記事では、機械学習を動かすことにフォーカスしてご紹介しました。
もう少し学術的に体系立てて学びたいという方には以下の書籍などがお勧めです。ぜひご一読下さい。
リンク
リンク
また動かせるだけから理解して応用できるエンジニアの足掛かりに下記のUdemyなどもお勧めです。
参考文献
1.
論文 - Third Time's the Charm? Image and Video Editing with StyleGAN3
2. GitHub - yuval-alaluf/stylegan3-editing


0 件のコメント :
コメントを投稿