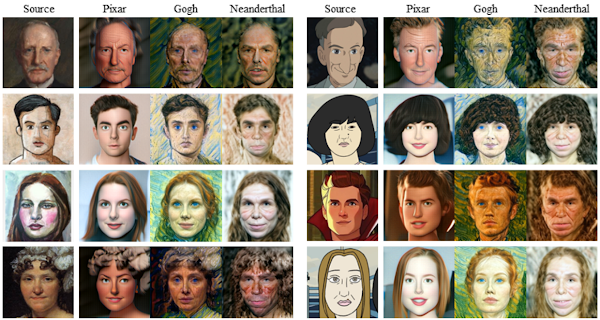
本記事では、DiffusionCLIPと呼ばれる機械学習手法を用いて、顔画像の操作やスタイル転送を行う方法をご紹介します。
DiffusionCLIP
概要
CLIPとGan
inversionによって、テキストクエリを入力にゼロショットの画像操作が可能となりました。しかし、Gan
inversionの制限から多様な画像への適用は依然として困難でした。
DiffusionCLIPでは、diffusion(拡散過程)モデルを用いて優れたGan
inversion機能と高品質な画像生成機能を獲得し、未知のドメインにおける、ゼロショットでの自然な画像操作を実現しています。
詳細はこちらの論文をご参照ください。
本記事では上記手法を用いて、顔画像の編集・スタイル転送を行う方法をご紹介します。
デモ(Colaboratory)
それでは、実際に動かしながら顔画像の編集・スタイル転送を行っていきます。
ソースコードは本記事にも記載していますが、下記のGitHubでも取得可能です。
GitHub - Colaboratory demo
また、下記から直接Google Colaboratoryで開くこともできます。

また、このデモはPythonで実装しています。
Pythonの実装に不安がある方、Pythonを使った機械学習について詳しく勉強したい方は、以下の書籍やオンライン講座などがおすすめです。
環境セットアップ
それではセットアップしていきます。
Colaboratoryを開いたら下記を設定しGPUを使用するようにしてください。
「ランタイムのタイプを変更」→「ハードウェアアクセラレータ」をGPUに変更
初めに、論文発表元のGithubからソースコードを取得します
%cd /content

!git clone https://github.com/gwang-kim/DiffusionCLIP.git
次に各種ライブラリをインストールします。
!pip install ftfy regex tqdm
!pip install --upgrade gdown
!pip install git+https://github.com/openai/CLIP.git
ライブラリをインポートします。
%cd /content/DiffusionCLIP

from diffusionclip import DiffusionCLIP
from main import dict2namespace
import argparse
import yaml
from PIL import Image
import os

import warnings
warnings.filterwarnings(action='ignore')

import torch
device = 'cuda' if torch.cuda.is_available() else "cpu"
print("using device is", device)

# モジュールの再読み込み
%load_ext autoreload
%autoreload 2
学習済みモデルのセットアップ
論文発表元が公開する学習済みモデルをダウンロードします。
%cd /content/DiffusionCLIP
!mkdir pretrained
%cd pretrained

# Finetune Human face model download
if not os.path.exists('human_pixar_t601.pth'):
  !gdown 'https://drive.google.com/uc?id=1IoT7kZhtaoKf1uvhYhvyqzyG2MOJsqLe'
if not os.path.exists('human_neanderthal_t601.pth'):
  !gdown 'https://drive.google.com/uc?id=1Uo0VI5kbATrQtckhEBKUPyRFNOcgwwne'
if not os.path.exists('human_gogh_t601.pth'):
  !gdown 'https://drive.google.com/uc?id=1NXOL8oKTGLtpTsU_Vh5h0DmMeH7WG8rQ'
if not os.path.exists('human_tanned_t201.pth'):
  !gdown 'https://drive.google.com/uc?id=1k6aDDOedRxhjFsJIA0dZLi2kKNvFkSYk'
if not os.path.exists('human_male_t401.pth'):
  !gdown 'https://drive.google.com/uc?id=1n1GMVjVGxSwaQuWxoUGQ2pjV8Fhh72eh'
if not os.path.exists('human_sketch_t601.pth'):
  !gdown 'https://drive.google.com/uc?id=1V9HDO8AEQzfWFypng72WQJRZTSQ272gb'
if not os.path.exists('human_with_makeup_t301.pth'):
  !gdown 'https://drive.google.com/uc?id=1OL0mKK48wvaFaWGEs3GHsCwxxg7LexOh'
if not os.path.exists('human_without_makeup_t301.pth'):
  !gdown 'https://drive.google.com/uc?id=157pTJBkXPoziGQdjy3SwdyeSpAjQiGRp'

if not os.path.exists('512x512_diffusion.pt'):
  !wget pretrained/ https://openaipublic.blob.core.windows.net/diffusion/jul-2021/512x512_diffusion.pt

if not os.path.exists('imagenet_watercolor_t601.pth'):
  !gdown 'https://drive.google.com/uc?id=1l1vLwdL-6kC9jKcStASZ0KtX2OrmrSj6'
if not os.path.exists('imagenet_pointillism_t601.pth'):
  !gdown 'https://drive.google.com/uc?id=1Am1Iii7jH986XQUuVaDs4v5s1h_acg0w'
if not os.path.exists('imagenet_gogh_t601.pth'):
  !gdown 'https://drive.google.com/uc?id=1ZPeOvMpFStw8RXJga_0pWLJ7iIWEQIVY'
if not os.path.exists('imagenet_cubism_t601.pth'):
  !gdown 'https://drive.google.com/uc?id=1xEx4_MXvbvtSqLzn6z49RUnPDFoDv9Vm'
モデルの数が多いのでトータルで10分弱ほどかかる場合があります。
テスト画像のセットアップ
モデルに入力する画像をGoogle Colaboratoryに配置します。
本記事では、こちらのぱくたそ様の画像を使用させていただきます。
%cd /content/DiffusionCLIP
!mkdir test_imgs
%cd test_imgs

!wget https://www.pakutaso.com/shared/img/thumb/kys150922346900.jpg

!wget https://www.pakutaso.com/shared/img/thumb/kawamurassIMGL3813_TP_V4.jpg
# 画像の中心から512x512をcrop
def crop_center(pil_img, crop_width, crop_height):
    img_width, img_height = pil_img.size
    return pil_img.crop(((img_width - crop_width) // 2,
                         (img_height - crop_height) // 2,
                         (img_width + crop_width) // 2,
                         (img_height + crop_height) // 2))
img = Image.open('kawamurassIMGL3813_TP_V4.jpg')
im_crop = crop_center(img, 512, 512)
im_crop.save('crop.jpg')
Human face manipulation
まず、顔画像の操作を行います。
%cd /content/DiffusionCLIP

model_dict = {
    'Pixar':            "pretrained/human_pixar_t601.pth",
    'Neanderthal':      "pretrained/human_neanderthal_t601.pth",
    'Painting by Gogh': "pretrained/human_gogh_t601.pth",
    'Tanned':           "pretrained/human_tanned_t201.pth",
    'Female → Male':   "pretrained/human_male_t401.pth",
    'Sketch':           "pretrained/human_sketch_t601.pth",
    'With makeup':      "pretrained/human_with_makeup_t301.pth",
    'Without makeup':   "pretrained/human_without_makeup_t301.pth",
    }
各種パラメータを設定し実行します。
%cd /content/DiffusionCLIP


# @markdown 入力画像パス
img_path = "test_imgs/kys150922346900.jpg" #@param {type:"string"}
# @markdown 顔部分切り取り
align_face = True #@param {type:"boolean"}

# @markdown type
edit_type = 'Female \u2192 Male' #@param ['Pixar', 'Neanderthal','Sketch', 'Painting by Gogh', 'Tanned',  'With makeup', 'Without makeup', 'Female → Male']
degree_of_change = 1 #@param {type:"slider", min:0.0, max:1.0, step:0.01}

n_inv_step =  40#@param {type: "integer"}
n_test_step = 6 #@param [6]


model_path = model_dict[edit_type]
t_0 = int(model_path.split('_t')[-1].replace('.pth',''))

exp_dir = f"runs/MANI_{img_path.split('/')[-1]}_align{align_face}"
os.makedirs(exp_dir, exist_ok=True)

args_dic = {
    'config': 'celeba.yml',
    't_0': t_0,
    'n_inv_step': int(n_inv_step),
    'n_test_step': int(n_test_step),
    'sample_type': 'ddim',
    'eta': 0.0,
    'bs_test': 1,
    'model_path': model_path,
    'img_path': img_path,
    'deterministic_inv': 1,
    'hybrid_noise': 0,
    'n_iter': 1,
    'align_face': align_face,
    'image_folder': exp_dir,
    'model_ratio': degree_of_change,
    'edit_attr': None, 'src_txts': None, 'trg_txts': None,
    }
args = dict2namespace(args_dic)

with open(os.path.join('configs', args.config), 'r') as f:
    config_dic = yaml.safe_load(f)
config = dict2namespace(config_dic)
config.device = device

# Edit
runner = DiffusionCLIP(args, config)
runner.edit_one_image()

# Result
print()
n_result = 1
img = Image.open(os.path.join(exp_dir, '0_orig.png'))
img = img.resize((int(img.width), int(img.height)))
grid = Image.new("RGB", (img.width*(n_result+1), img.height))
grid.paste(img, (0, 0))
for i in range(n_result):
  img = Image.open(os.path.join(exp_dir, f"3_gen_t{t_0}_it0_ninv{n_inv_step}_ngen{n_test_step}_mrat{degree_of_change}_{model_path.split('/')[-1].replace('.pth','')}.png"))
  img = img.resize((int(img.width), int(img.height)))
  grid.paste(img, (int(img.height * (i+1)), 0))
grid
各タイプの出力結果は以下の通りです。
Style Transfer
続いてスタイル転送を試してみます。
%cd /content/DiffusionCLIP

model_dict = {
    'Watercolor art':            "pretrained/imagenet_watercolor_t601.pth",
    'Pointillism art':      "pretrained/imagenet_pointillism_t601.pth",
    'Painting by Gogh': "pretrained/imagenet_gogh_t601.pth",
    'Cubism art':           "pretrained/imagenet_cubism_t601.pth",
    }
各種パラメータを設定し実行します。
%cd /content/DiffusionCLIP


# @markdown 入力画像パス
img_path = "test_imgs/crop.jpg" #@param {type:"string"}
# @markdown type
edit_type = 'Painting by Gogh' #@param ['Watercolor art', 'Pointillism art','Painting by Gogh', 'Cubism art']
degree_of_change = 1 #@param {type:"slider", min:0.0, max:1.0, step:0.01}

n_inv_step =  120#@param {type: "integer"}
n_test_step = 6 #@param [6]

model_path = model_dict[edit_type]

t_0 = int(model_path.split('_t')[-1].replace('.pth',''))

exp_dir = f"runs/MANI_{img_path.split('/')[-1]}"
os.makedirs(exp_dir, exist_ok=True)

args_dic = {
    'config': 'imagenet.yml',
    't_0': t_0,
    'n_inv_step': int(n_inv_step),
    'n_test_step': int(n_test_step),
    'sample_type': 'ddim',
    'eta': 0.0,
    'bs_test': 1,
    'model_path': model_path,
    'img_path': img_path,
    'deterministic_inv': 1,
    'hybrid_noise': 0,
    'n_iter': 1,
    'align_face': 0,
    'image_folder': exp_dir,
    'model_ratio': degree_of_change,
    'edit_attr': None, 'src_txts': None, 'trg_txts': None,
    }
args = dict2namespace(args_dic)

with open(os.path.join('configs', args.config), 'r') as f:
    config_dic = yaml.safe_load(f)
config = dict2namespace(config_dic)
config.device = device

# Edit
runner = DiffusionCLIP(args, config)
runner.edit_one_image()

# Result
print()
n_result = 1
img = Image.open(os.path.join(exp_dir, '0_orig.png'))
img = img.resize((int(img.width), int(img.height)))
grid = Image.new("RGB", (img.width*(n_result+1), img.height))
grid.paste(img, (0, 0))
for i in range(n_result):
  img = Image.open(os.path.join(exp_dir, f"3_gen_t{t_0}_it0_ninv{n_inv_step}_ngen{n_test_step}_mrat{degree_of_change}_{model_path.split('/')[-1].replace('.pth','')}.png"))
  img = img.resize((int(img.width), int(img.height)))
  grid.paste(img, (int(img.height * (i+1)), 0))
grid
各タイプの出力結果は以下の通りです。
まとめ
本記事では、DiffusionCLIPを用いた顔画像の操作、スタイル転送を行いました。
出力結果が視覚的に確認しやすいので、とりあえず動かして楽しみながら学ぶにはうってつけです。
また本記事では、機械学習を動かすことにフォーカスしてご紹介しました。
もう少し学術的に体系立てて学びたいという方には以下の書籍などがお勧めです。ぜひご一読下さい。
リンク
リンク
また動かせるだけから理解して応用できるエンジニアの足掛かりに下記のUdemyなどもお勧めです。
参考文献
1.
論文 - DiffusionCLIP: Text-Guided Diffusion Models for Robust Image Manipulation
2. GitHub - gwang-kim/DiffusionCLIP


0 件のコメント :
コメントを投稿