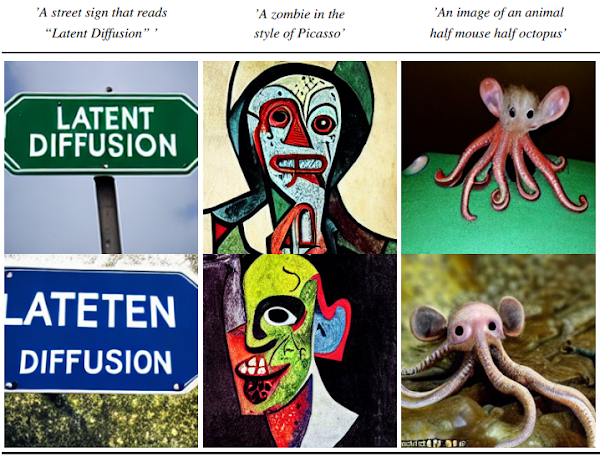
本記事では、latent diffusion
modelsと呼ばれる機械学習手法を用いて、クラス条件付き画像生成、Text to
Imageを行う方法をご紹介します。
latent diffusion models(LDMs)
概要
従来の拡散モデル(Diffusion
Models)は、学習データに段階的にノイズを加えていき、全ての情報が失われて完全なノイズになる過程を逆向きに辿ることでモデルを学習させています。
この拡散モデルは、画像生成タスクにおいて最先端のパフォーマンスを発揮しますが、トレーニングや推論に膨大なGPUリソースを必要とする場合がありました。
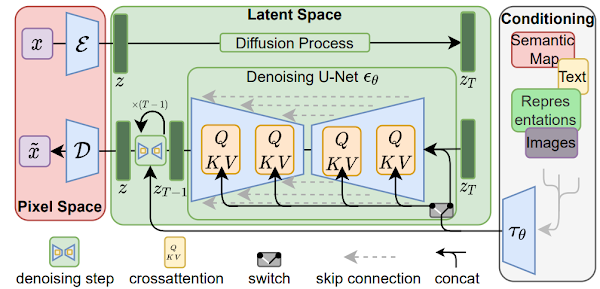
潜在拡散モデル(Latent Diffusion
Models)では、クロスアッテンションレイヤーを導入し、計算量を大幅に削減しながら、従来に匹敵するパフォーマンスを実現しています。
詳細はこちらの論文をご参照ください。
本記事では上記手法を用いて、クラス条件付き画像生成(Class-conditional Image
Synthesis)と、テキストからの画像生成(Text to Image)を行います。
なお、以下の記事では、有償にはなりますが、より詳細な技術解説、ソースコードを記載しています。
よろしければご覧ください。
Latent Diffusion Modelsを用いてテキストから画像を生成するレシピ
本レシピでは、LatentDiffusionModelsの技術概要を解説し、Huggingfaceのdiffusersライブラリを用いて、テキストから画像を生成する方法や、モデルが画像を生成する過程をアニメーションで可視化する方法をご...
デモ(Colaboratory)
それでは、実際に動かしながらクラス条件付き画像生成・画像編集を行っていきます。
ソースコードは本記事にも記載していますが、下記のGitHubでも取得可能です。
GitHub - Colaboratory demo
また、下記から直接Google Colaboratoryで開くこともできます。

また、このデモはPythonで実装しています。
Pythonの実装に不安がある方、Pythonを使った機械学習について詳しく勉強したい方は、以下の書籍やオンライン講座などがおすすめです。
環境セットアップ
それではセットアップしていきます。
Colaboratoryを開いたら下記を設定しGPUを使用するようにしてください。
「ランタイムのタイプを変更」→「ハードウェアアクセラレータ」をGPUに変更
初めに、論文発表元のGithubからソースコードを取得します
%cd /content

!git clone https://github.com/CompVis/latent-diffusion.git
次にライブラリをインストールします。
%cd /content

!git clone https://github.com/CompVis/taming-transformers
!pip install -e ./taming-transformers
!pip install omegaconf>=2.0.0 pytorch-lightning>=1.0.8 torch-fidelity einops

import sys
sys.path.append(".")
sys.path.append('./taming-transformers')
from taming.models import vqgan
以上で環境セットアップは完了です。
学習済みモデルのセットアップ
続いて、論文発表元が提供している学習済みモデルをダウンロードします。
モデルサイズが非常に大きく(1.7GB,
5.73GB)、約10分ほどダウンロードに時間がかかる場合があります。
%cd /content/latent-diffusion/

import os

if not os.path.exists("models/ldm/cin256-v2/model.ckpt"):
  !mkdir -p models/ldm/cin256-v2/
  !wget -O models/ldm/cin256-v2/model.ckpt https://ommer-lab.com/files/latent-diffusion/nitro/cin/model.ckpt

if not os.path.exists("models/ldm/text2img-large/model.ckpt"):
  !mkdir -p models/ldm/text2img-large/
  !wget -O models/ldm/text2img-large/model.ckpt https://ommer-lab.com/files/latent-diffusion/nitro/txt2img-f8-large/model.ckpt
その他のセットアップ
セットアップの最後に、ライブラリのインポートとUtil関数を定義しておきます。
import torch
from omegaconf import OmegaConf

from ldm.util import instantiate_from_config
from ldm.models.diffusion.ddim import DDIMSampler

import numpy as np
from PIL import Image
from einops import rearrange
from torchvision.utils import make_grid

def load_model_from_config(config, ckpt):
    print(f"Loading model from {ckpt}")
    pl_sd = torch.load(ckpt)#, map_location="cpu")
    sd = pl_sd["state_dict"]
    model = instantiate_from_config(config.model)
    m, u = model.load_state_dict(sd, strict=False)
    model.cuda()
    model.eval()
    return model


def get_model():
    config = OmegaConf.load("configs/latent-diffusion/cin256-v2.yaml")
    model = load_model_from_config(config, "models/ldm/cin256-v2/model.ckpt")
    return model
Class-conditional Image Synthesis(クラス条件付き画像生成)
それでは、ImageNetのクラスを指定して、クラスに応じた画像を生成していきます。
まず、モデルをビルドします。
model = get_model()
sampler = DDIMSampler(model)
次に画像を生成したクラスを選択します。
category = "100) black swan, Cygnus atratus" # コード行数が多いため割愛。https://github.com/kaz12tech/ai_demos/blob/main/LatentDiffusion_demo.ipynbをご確認ください。

classes = [ int(category.split(')')[0]) ]
n_samples_per_class = 6

ddim_steps = 20
ddim_eta = 0.0
scale = 3.0   # for unconditional guidance
クラス条件付き画像生成を実施します。
all_samples = list()

with torch.no_grad():
    with model.ema_scope():
        uc = model.get_learned_conditioning(
            {model.cond_stage_key: torch.tensor(n_samples_per_class*[1000]).to(model.device)}
            )

        for class_label in classes:
            print(f"rendering {n_samples_per_class} examples of class '{class_label}' in {ddim_steps} steps and using s={scale:.2f}.")
            xc = torch.tensor(n_samples_per_class*[class_label])
            c = model.get_learned_conditioning({model.cond_stage_key: xc.to(model.device)})

            samples_ddim, _ = sampler.sample(S=ddim_steps,
                                             conditioning=c,
                                             batch_size=n_samples_per_class,
                                             shape=[3, 64, 64],
                                             verbose=False,
                                             unconditional_guidance_scale=scale,
                                             unconditional_conditioning=uc,
                                             eta=ddim_eta)

            x_samples_ddim = model.decode_first_stage(samples_ddim)
            x_samples_ddim = torch.clamp((x_samples_ddim+1.0)/2.0,
                                         min=0.0, max=1.0)
            all_samples.append(x_samples_ddim)


# display as grid
grid = torch.stack(all_samples, 0)
grid = rearrange(grid, 'n b c h w -> (n b) c h w')
grid = make_grid(grid, nrow=n_samples_per_class)

# to image
grid = 255. * rearrange(grid, 'c h w -> h w c').cpu().numpy()
Image.fromarray(grid.astype(np.uint8))
出力結果は以下の通りです。
写真のような鮮明さです。
Text to Image
続いて、任意のテキストを入力し、テキストに応じた画像を生成します。
初めに、追加でライブラリのインストールします。
!pip install autokeras
!pip install open_clip_torch
!pip install transformers
追加でライブラリをインポートします。
from open_clip import tokenizer
import open_clip
import transformers
import gc
from ldm.models.diffusion.plms import PLMSSampler
from tqdm.auto import tqdm, trange
import argparse
モデルをビルドします。
model_path = "/content/latent-diffusion/models/ldm/text2img-large/model.ckpt"

%cd /content/latent-diffusion/


def load_safety_model(clip_model):
    """load the safety model"""
    import autokeras as ak  # pylint: disable=import-outside-toplevel
    from tensorflow.keras.models import load_model  # pylint: disable=import-outside-toplevel
    from os.path import expanduser  # pylint: disable=import-outside-toplevel

    home = expanduser("~")

    cache_folder = home + "/.cache/clip_retrieval/" + clip_model.replace("/", "_")
    if clip_model == "ViT-L/14":
        model_dir = cache_folder + "/clip_autokeras_binary_nsfw"
        dim = 768
    elif clip_model == "ViT-B/32":
        model_dir = cache_folder + "/clip_autokeras_nsfw_b32"
        dim = 512
    else:
        raise ValueError("Unknown clip model")
    if not os.path.exists(model_dir):
        os.makedirs(cache_folder, exist_ok=True)

        from urllib.request import urlretrieve  # pylint: disable=import-outside-toplevel

        path_to_zip_file = cache_folder + "/clip_autokeras_binary_nsfw.zip"
        if clip_model == "ViT-L/14":
            url_model = "https://raw.githubusercontent.com/LAION-AI/CLIP-based-NSFW-Detector/main/clip_autokeras_binary_nsfw.zip"
        elif clip_model == "ViT-B/32":
            url_model = (
                "https://raw.githubusercontent.com/LAION-AI/CLIP-based-NSFW-Detector/main/clip_autokeras_nsfw_b32.zip"
            )
        else:
            raise ValueError("Unknown model {}".format(clip_model))
        urlretrieve(url_model, path_to_zip_file)
        import zipfile  # pylint: disable=import-outside-toplevel

        with zipfile.ZipFile(path_to_zip_file, "r") as zip_ref:
            zip_ref.extractall(cache_folder)

    loaded_model = load_model(model_dir, custom_objects=ak.CUSTOM_OBJECTS)
    loaded_model.predict(np.random.rand(10 ** 3, dim).astype("float32"), batch_size=10 ** 3)

    return loaded_model

def is_unsafe(safety_model, embeddings, threshold=0.5):
    """find unsafe embeddings"""
    nsfw_values = safety_model.predict(embeddings, batch_size=embeddings.shape[0])
    x = np.array([e[0] for e in nsfw_values])
    #print(x)
    return True if x > threshold else False
#NSFW CLIP Filter
safety_model = load_safety_model("ViT-B/32")
clip_model, _, preprocess = open_clip.create_model_and_transforms('ViT-B-32', pretrained='openai')

def load_model_from_config(config, ckpt, verbose=False):
    print(f"Loading model from {ckpt}")
    pl_sd = torch.load(ckpt, map_location="cuda:0")
    sd = pl_sd["state_dict"]
    model = instantiate_from_config(config.model)
    m, u = model.load_state_dict(sd, strict=False)
    if len(m) > 0 and verbose:
        print("missing keys:")
        print(m)
    if len(u) > 0 and verbose:
        print("unexpected keys:")
        print(u)

    model = model.half().cuda()
    model.eval()
    return model

config = OmegaConf.load("configs/latent-diffusion/txt2img-1p4B-eval.yaml")
model = load_model_from_config(config, model_path)

device = torch.device("cuda") if torch.cuda.is_available() else torch.device("cpu")
model = model.to(device)
def run(opt):
    torch.cuda.empty_cache()
    gc.collect()
    if opt.plms:
        opt.ddim_eta = 0
        sampler = PLMSSampler(model)
    else:
        sampler = DDIMSampler(model)

    os.makedirs(opt.outdir, exist_ok=True)
    outpath = opt.outdir

    prompt = opt.prompt


    sample_path = os.path.join(outpath, "samples")
    os.makedirs(sample_path, exist_ok=True)
    base_count = len(os.listdir(sample_path))

    all_samples=list()
    with torch.no_grad():
        with torch.cuda.amp.autocast():
            with model.ema_scope():
                uc = None
                if opt.scale > 0:
                    uc = model.get_learned_conditioning(opt.n_samples * [""])
                for n in trange(opt.n_iter, desc="Sampling"):
                    c = model.get_learned_conditioning(opt.n_samples * [prompt])
                    shape = [4, opt.H//8, opt.W//8]
                    samples_ddim, _ = sampler.sample(S=opt.ddim_steps,
                                                    conditioning=c,
                                                    batch_size=opt.n_samples,
                                                    shape=shape,
                                                    verbose=False,
                                                    unconditional_guidance_scale=opt.scale,
                                                    unconditional_conditioning=uc,
                                                    eta=opt.ddim_eta)

                    x_samples_ddim = model.decode_first_stage(samples_ddim)
                    x_samples_ddim = torch.clamp((x_samples_ddim+1.0)/2.0, min=0.0, max=1.0)

                    for x_sample in x_samples_ddim:
                        x_sample = 255. * rearrange(x_sample.cpu().numpy(), 'c h w -> h w c')
                        image_vector = Image.fromarray(x_sample.astype(np.uint8))
                        image = preprocess(image_vector).unsqueeze(0)
                        with torch.no_grad():
                          image_features = clip_model.encode_image(image)
                        image_features /= image_features.norm(dim=-1, keepdim=True)
                        query = image_features.cpu().detach().numpy().astype("float32")
                        unsafe = is_unsafe(safety_model,query,opt.nsfw_threshold)
                        if(not unsafe):
                          image_vector.save(os.path.join(sample_path, f"{base_count:04}.png"))
                        else:
                          raise Exception('Potential NSFW content was detected on your outputs. Try again with different prompts. If you feel your prompt was not supposed to give NSFW outputs, this may be due to a bias in the model')
                        base_count += 1
                    all_samples.append(x_samples_ddim)


    # additionally, save as grid
    grid = torch.stack(all_samples, 0)
    grid = rearrange(grid, 'n b c h w -> (n b) c h w')
    grid = make_grid(grid, nrow=opt.n_samples)

    # to image
    grid = 255. * rearrange(grid, 'c h w -> h w c').cpu().numpy()

    Image.fromarray(grid.astype(np.uint8)).save(os.path.join(outpath, f'{prompt.replace(" ", "-")}.png'))
    display(Image.fromarray(grid.astype(np.uint8)))
最後に任意のテキストを設定し、Text to Imageを実行します。
Prompt = "hell and heaven" #@param{type:"string"}
Steps =  50#@param {type:"integer"}
ETA = 0.0 #@param{type:"number"}
Iterations =  2#@param{type:"integer"}
Width=512 #@param{type:"integer"}
Height=256 #@param{type:"integer"}
Samples_in_parallel=3 #@param{type:"integer"}
Diversity_scale=5.0 #@param {type:"number"}
PLMS_sampling=True #@param {type:"boolean"}

args = argparse.Namespace(
    prompt = Prompt,
    outdir="outputs",
    ddim_steps = Steps,
    ddim_eta = ETA,
    n_iter = Iterations,
    W=Width,
    H=Height,
    n_samples=Samples_in_parallel,
    scale=Diversity_scale,
    plms=PLMS_sampling,
    nsfw_threshold=0.5
)
run(args)
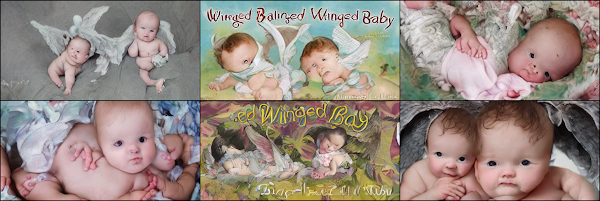
実行結果は以下の通りです。
hell and heaven
Cherry blossoms on the sea by hokusai style
cyberpunk forest
Winged baby
写実的で芸術的な画像が出力されました。
個人的にHokusaiスタイルがお気に入りです。
まとめ
本記事では、Latent Diffusionを用いたクラス条件付き画像生成、Text to Imageを行いました。
Text to Imageは、入力するテキストを変えることで様々な画像が生成でき、テキストを変えて動かしているだけでなかなか楽しめます。
また本記事では、機械学習を動かすことにフォーカスしてご紹介しました。
もう少し学術的に体系立てて学びたいという方には以下の書籍などがお勧めです。ぜひご一読下さい。
リンク
リンク
また動かせるだけから理解して応用できるエンジニアの足掛かりに下記のUdemyなどもお勧めです。
参考文献
1.
論文 - High-Resolution Image Synthesis with Latent Diffusion Models
2. GitHub - CompVis/latent-diffusion


0 件のコメント :
コメントを投稿