本記事では、機械学習手法HyperStyleを用いて任意の画像を高精度に潜在空間に投影する方法をご紹介します。
HyperStyle
概要
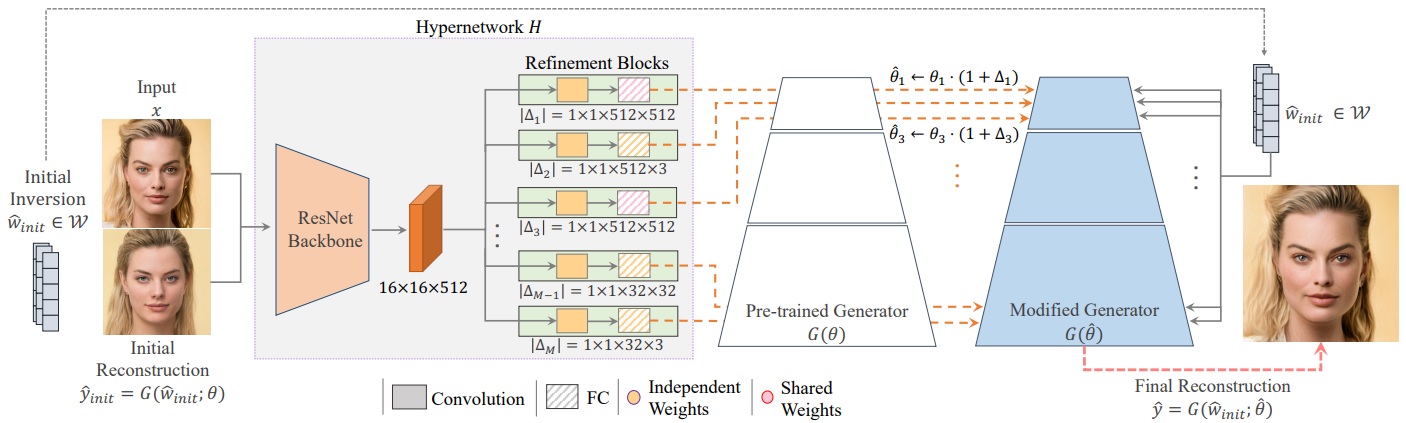
画像をStyleGANに入力し画像編集等を行う場合、一度画像を潜在空間ベクトルに変換(Inversion)する必要があります。
この時、入力画像を正確に潜在空間に投影できる潜在空間では、画像編集などの制御の精度が低下するという問題がある一方で、制御の精度を高めると、潜在空間への投影の精度が低下するという、再構成と編集可能性の間にはトレードオフの関係が存在することが知られています。
HyperStyleでは、このトレードオフの軽減と変換の高速化のため、事前トレーニングされたジェネレータを使用して、近似潜在コード(Initial
Reconstruction)を生成します。
次に、HyperNetwork内でジェネレータの重みを変調するためオフセットを予測します。これによりModified
Generatorが生成され、最終的に再構成されたジェネレータを使用して変換を実現します。
詳細はこちらの論文をご参照ください。
本記事では上記手法を用いて、任意の画像を潜在空間にInversionしていきます。
デモ(Colaboratory)
それでは、実際に動かしながらInversionを試してみます。
ソースコードは本記事にも記載していますが、下記のGitHubでも取得可能です。
GitHub - Colaboratory demo
また、下記から直接Google Colaboratoryで開くこともできます。

また、このデモはPythonで実装しています。
Pythonの実装に不安がある方、Pythonを使った機械学習について詳しく勉強したい方は、以下の書籍やオンライン講座などがおすすめです。
環境セットアップ
それではセットアップしていきます。
Colaboratoryを開いたら下記を設定しGPUを使用するようにしてください。
「ランタイムのタイプを変更」→「ハードウェアアクセラレータ」をGPUに変更
初めにGithubからソースコードを取得します。
%cd /content

# for hyperstyle
!git clone https://github.com/yuval-alaluf/hyperstyle.git
次にライブラリをインストールします。
%cd /content/hyperstyle

!pip install --upgrade gdown
!pip install moviepy

# install ninja
!wget https://github.com/ninja-build/ninja/releases/download/v1.8.2/ninja-linux.zip
!sudo unzip ninja-linux.zip -d /usr/local/bin/
!sudo update-alternatives --install /usr/bin/ninja ninja /usr/local/bin/ninja 1 --force
最後にライブラリをインポートします。
%cd /content/hyperstyle

import time
import sys
import pprint
from tqdm import tqdm
import numpy as np
from PIL import Image
import torch
import torchvision.transforms as transforms
import os
import gdown
import glob

import imageio
from IPython.display import HTML
from base64 import b64encode

from moviepy.video.fx.resize import resize
from moviepy.editor import VideoFileClip

from notebooks.notebook_utils import Downloader, HYPERSTYLE_PATHS, W_ENCODERS_PATHS, run_alignment
from utils.common import tensor2im
from utils.inference_utils import run_inversion
from utils.domain_adaptation_utils import run_domain_adaptation
from utils.model_utils import load_model, load_generator

SEED = 12
np.random.seed(SEED)
以上で環境セットアップは完了です。
学習済みモデルのセットアップ
続いて論文発表元が公開する学習済みモデルをGoogle Colaboratoryにダウンロードします。
%cd /content/hyperstyle
!mkdir pretrained_models

hyper = "./pretrained_models/hyperstyle_ffhq.pt"
w_encoder = "./pretrained_models/faces_w_encoder.pt"

if not os.path.exists(hyper):
  gdown.download('https://drive.google.com/uc?id='+'1C3dEIIH1y8w1-zQMCyx7rDF0ndswSXh4', hyper, quiet=False)
if not os.path.exists(w_encoder):
  gdown.download('https://drive.google.com/uc?id='+'1M-hsL3W_cJKs77xM1mwq2e9-J0_m7rHP', w_encoder, quiet=False)

img_transforms = transforms.Compose([
                                transforms.Resize((256, 256)),
                                transforms.ToTensor(),
                                transforms.Normalize([0.5, 0.5, 0.5], [0.5, 0.5, 0.5])])
テスト画像のセットアップ
続いてモデルに入力する画像をダウンロードします。
本記事では、ぱくたそ様の画像を使用させていただきます。
%cd /content/hyperstyle
!mkdir input_imgs

# root_dir = "./notebooks/images/animations"
# image_paths = glob.glob(root_dir+"/*.jpg")

!wget -c https://www.pakutaso.com/shared/img/thumb/SAYA160312500I9A3721_TP_V4.jpg -O ./input_imgs/test_1.jpg
!wget -c https://www.pakutaso.com/shared/img/thumb/SAYA072160333_TP_V4.jpg -O ./input_imgs/test_2.jpg
!wget -c https://www.pakutaso.com/shared/img/thumb/saya0I9A4189072170014_TP_V4.jpg -O ./input_imgs/test_3.jpg
!wget -c https://www.pakutaso.com/shared/img/thumb/SAYA160312500I9A3721_TP_V4.jpg -O ./input_imgs/test_4.jpg
!wget -c https://www.pakutaso.com/shared/img/thumb/SAYA0I9A8598_TP_V4.jpg -O ./input_imgs/test_5.jpg
!wget -c https://www.pakutaso.com/shared/img/thumb/akanesaya0I9A3747_TP_V4.jpg -O ./input_imgs/test_6.jpg

root_dir = "./input_imgs"
image_paths = glob.glob(root_dir+"/*.jpg")
Face alignment
画像から顔部分を切り出し位置合わせを行います。
%cd /content/hyperstyle

aligned_image_paths = []
for image_path in image_paths:
  image_name = os.path.splitext(os.path.basename(image_path))[0]
  aligned_image = run_alignment(image_path)
  aligned_path = os.path.join(root_dir, f'{image_name}_aligned.jpg')
  # save the aligned image
  aligned_image.save(aligned_path)
  aligned_image_paths.append(aligned_path)
  # use the save aligned images as our input image paths
  image_paths = aligned_image_paths


Inversion
最後に切り出した画像を正確に潜在空間へInversionします。
in_images = []
all_vecs = []
all_weights_deltas = []

resize_amount = (opts.output_size, opts.output_size)

# Inference
for image_path in image_paths:
  original_image = Image.open(image_path)
  original_image = original_image.convert("RGB")
  input_image = img_transforms(original_image)
  # get the weight deltas for each image
  result_vec, weights_deltas = get_latent_and_weight_deltas(input_image.unsqueeze(0), net, opts)
  all_vecs.append([result_vec])
  all_weights_deltas.append(weights_deltas)
  in_images.append(original_image.resize(resize_amount))
Inversionした各画像の中間画像を連続的に生成し動画を生成します。
n_transition = 25
SIZE = opts.output_size

images = []
image_paths.append(image_paths[0])
all_vecs.append(all_vecs[0])
all_weights_deltas.append(all_weights_deltas[0])
in_images.append(in_images[0])

for i in range(1, len(image_paths)):
  if i == 0:
    alpha_vals = [0] * 10 + np.linspace(0, 1, n_transition).tolist() + [1] * 5
  else:
    alpha_vals = [0] * 5 + np.linspace(0, 1, n_transition).tolist() + [1] * 5
  for alpha in tqdm(alpha_vals):
    image_a = np.array(in_images[i - 1])
    image_b = np.array(in_images[i])
    image_joint = np.zeros_like(image_a)
    up_to_row = int((SIZE - 1) * alpha)
    if up_to_row > 0:
      image_joint[:(up_to_row + 1), :, :] = image_b[((SIZE - 1) - up_to_row):, :, :]
    if up_to_row < (SIZE - 1):
      image_joint[up_to_row:, :, :] = image_a[:(SIZE - up_to_row), :, :]
    result_image = get_result_from_vecs(
        all_vecs[i - 1], all_vecs[i],
        all_weights_deltas[i - 1], all_weights_deltas[i],alpha)[0]

    output_im = tensor2im(result_image)
    res = np.concatenate([image_joint, np.array(output_im)], axis=1)
    images.append(res)
出力結果は以下の通りです。
kwargs = {'fps': 15}
save_path = "./output"
os.makedirs(save_path, exist_ok=True)

gif_path = os.path.join(save_path, "face_gif")
generate_mp4(gif_path, images, kwargs)

clip = VideoFileClip(gif_path+".mp4")
clip = resize(clip, height=420)
clip.ipython_display()
まとめ
本記事では、HyperStyleを用いて任意の画像を潜在空間へ投影する方法をご紹介しました。
StyleGANで画像編集する際に、そもそも投影時点で元画像から離れた画像が投影されるケースも少なくありません。
HyperStyleでこの課題が軽減されそうです。
また本記事では、機械学習を動かすことにフォーカスしてご紹介しました。
もう少し学術的に体系立てて学びたいという方には以下の書籍などがお勧めです。ぜひご一読下さい。
リンク
リンク
また動かせるだけから理解して応用できるエンジニアの足掛かりに下記のUdemyなどもお勧めです。
参考文献
1.
論文 - HyperStyle: StyleGAN Inversion with HyperNetworks for Real Image Editing
2. GitHub - yuval-alaluf/hyperstyle


0 件のコメント :
コメントを投稿