本記事では、VToonifyと呼ばれる機械学習手法を用いて任意の動画をアニメ風画像に変換する方法をご紹介します。
VToonify
概要
VToonifyは高解像度のビデオスタイル転送技術です。
従来技術によるビデオのToonifyモデルは、顔の位置合わせの要件、顔以外の精細さの欠落などビデオに適用する場合に制限がありました。
VToonifyでは、StyleGANの中解像度レイヤーと高解像度レイヤーを活用し、エンコーダーによって抽出したマルチスケールな特徴量を用いて高品質なポートレートをレンダリングします。
この方式により可変サイズのビデオ内の位置合わせされていない顔を入力可能としています。
詳細はこちらの論文をご参照ください。
本記事では上記手法を用いて、任意の動画をアニメ風に変換していきます。
デモ(Colaboratory)
それでは、実際に動かしながら任意の動画のスタイル転送を行っていきます。
ソースコードは本記事にも記載していますが、下記のGitHubでも取得可能です。
GitHub - Colaboratory demo
また、下記から直接Google Colaboratoryで開くこともできます。

なお、このデモはPythonで実装しています。
Pythonの実装に不安がある方、Pythonを使った機械学習について詳しく勉強したい方は、以下の書籍やオンライン講座などがおすすめです。
環境セットアップ
それではセットアップしていきます。
Colaboratoryを開いたら下記を設定しGPUを使用するようにしてください。
「ランタイムのタイプを変更」→「ハードウェアアクセラレータ」をGPUに変更
初めにGithubからソースコードを取得します。
%cd /content

!git clone https://github.com/williamyang1991/VToonify.git


# Commits on Sep 23, 2022
%cd /content/VToonify
!git checkout 920b56478835873169b31dd3d134d29e7e16f94b
次にライブラリをインストールします。
%cd /content/VToonify

!wget https://github.com/ninja-build/ninja/releases/download/v1.8.2/ninja-linux.zip
!sudo unzip ninja-linux.zip -d /usr/local/bin/
!sudo update-alternatives --install /usr/bin/ninja ninja /usr/local/bin/ninja 1 --force
!pip install wget
!pip install --upgrade gdown

!pip install moviepy==0.2.3.5 imageio==2.4.1
!pip install yt-dlp
最後にライブラリをインポートします。
%load_ext autoreload
%autoreload 2

import sys
sys.path.append(".")
sys.path.append("..")

import os
import argparse
import numpy as np
import cv2
import dlib
import bz2
import torch
from torchvision import transforms
import torchvision
import torch.nn.functional as F
from tqdm import tqdm
import matplotlib.pyplot as plt
from model.vtoonify import VToonify
from model.bisenet.model import BiSeNet
from model.encoder.align_all_parallel import align_face
from util import save_image, load_image, visualize, load_psp_standalone, get_video_crop_parameter, tensor2cv2

from yt_dlp import YoutubeDL
from moviepy.video.fx.resize import resize
from moviepy.editor import VideoFileClip

device = 'cuda' if torch.cuda.is_available() else "cpu"
print("using device is", device)
以上で環境セットアップは完了です。
学習済みモデルのセットアップ
ここでは、論文発表元が公開する学習済みモデルをGoogle
Colaboratoryにダウンロードします。
%cd /content/VToonify

!mkdir ckpts

encoder_path = 'ckpts/encoder.pt'
if not os.path.exists(encoder_path):
  !gdown https://drive.google.com/uc?id=1NgI4mPkboYvYw3MWcdUaQhkr0OWgs9ej \
         -O {encoder_path}

faceparsing_path = 'ckpts/faceparsing.pth'
if not os.path.exists(faceparsing_path):
  !gdown https://drive.google.com/uc?id=1jY0mTjVB8njDh6e0LP_2UxuRK3MnjoIR \
         -O {faceparsing_path}

# cartoon_exstyle
exstyle_path = 'ckpts/exstyle_code.npy'
if not os.path.exists(exstyle_path):
  !gdown https://drive.google.com/uc?id=1BuCeLk3ASZcoHlbfT28qNru4r5f-hErr \
         -O {exstyle_path}

# cartoon026
style_type = 'cartoon026'
generator_path = 'ckpts/generator.pt'
if not os.path.exists(generator_path):
  !gdown https://drive.google.com/uc?id=1YJYODh_vEyUrL0q02okjcicpJhdYY8An \
         -O {generator_path}

landmark_path = 'ckpts/shape_predictor_68_face_landmarks.dat'
if not os.path.exists(landmark_path):
  !wget -c http://dlib.net/files/shape_predictor_68_face_landmarks.dat.bz2 \
        -O ckpts/shape_predictor_68_face_landmarks.dat.bz2
  zipfile = bz2.BZ2File('ckpts/shape_predictor_68_face_landmarks.dat.bz2')
  data = zipfile.read()
  open(landmark_path, 'wb').write(data)
モデルのロード
続いて、ダウンロードしたモデルをロードしていきます。
transform = transforms.Compose([
    transforms.ToTensor(),
    transforms.Normalize(mean=[0.5, 0.5, 0.5],std=[0.5,0.5,0.5]),
    ])

%cd /content/VToonify

# load generator
vtoonify = VToonify(backbone = 'dualstylegan')
vtoonify.load_state_dict(torch.load(generator_path, map_location=lambda storage, loc: storage)['g_ema'])
vtoonify.to(device)

# load faceparsing
parsingpredictor = BiSeNet(n_classes=19)
parsingpredictor.load_state_dict(torch.load(faceparsing_path, map_location=lambda storage, loc: storage))
parsingpredictor.to(device).eval()

# load randmark predicter
landmarkpredictor = dlib.shape_predictor(landmark_path)

# load encoder
pspencoder = load_psp_standalone(encoder_path, device)

exstyles = np.load(exstyle_path, allow_pickle='TRUE').item()
stylename = list(exstyles.keys())[int(style_type[-3:])]
exstyle = torch.tensor(exstyles[stylename]).to(device)
with torch.no_grad():
  exstyle = vtoonify.zplus2wplus(exstyle)
Image Toonification
まず、動画をToonificationしていきます。
%cd /content/VToonify

# image_path = './data/077436.jpg'
!wget -c https://www.pakutaso.com/shared/img/thumb/SAYA160312500I9A3721_TP_V.jpg \
      -O ./data/test01.jpg
image_path = './data/test01.jpg'

original_image = load_image(image_path)

visualize(original_image[0], 30)
こちらの画像をモデルに入力します。
画像から顔部分を検出します。
frame = cv2.imread(image_path)
frame = cv2.cvtColor(frame, cv2.COLOR_RGB2BGR)

scale = 1
kernel_1d = np.array([[0.125],[0.375],[0.375],[0.125]])
# We detect the face in the image, and resize the image so that the eye distance is 64 pixels.
# Centered on the eyes, we crop the image to almost 400x400 (based on args.padding).
paras = get_video_crop_parameter(frame, landmarkpredictor, padding=[200,200,200,200])
if paras is not None:
  h,w,top,bottom,left,right,scale = paras
  H, W = int(bottom-top), int(right-left)
  # for HR image, we apply gaussian blur to it to avoid over-sharp stylization results
  if scale <= 0.75:
    frame = cv2.sepFilter2D(frame, -1, kernel_1d, kernel_1d)
  if scale <= 0.375:
    frame = cv2.sepFilter2D(frame, -1, kernel_1d, kernel_1d)
  frame = cv2.resize(frame, (w, h))[top:bottom, left:right]
  x = transform(frame).unsqueeze(dim=0).to(device)
else:
  print('no face detected!')
Toonificationを実行します。
with torch.no_grad():
  I = align_face(frame, landmarkpredictor)
  I = transform(I).unsqueeze(dim=0).to(device)
  s_w = pspencoder(I)
  s_w = vtoonify.zplus2wplus(s_w)
  s_w[:,:7] = exstyle[:,:7]
  # parsing network works best on 512x512 images, so we predict parsing maps on upsmapled frames
  # followed by downsampling the parsing maps
  x_p = F.interpolate(parsingpredictor(2*(F.interpolate(x, scale_factor=2, mode='bilinear', align_corners=False)))[0],
                      scale_factor=0.5, recompute_scale_factor=False).detach()
  # we give parsing maps lower weight (1/16)
  inputs = torch.cat((x, x_p/16.), dim=1)
  # d_s has no effect when backbone is toonify
  y_tilde = vtoonify(inputs, s_w.repeat(inputs.size(0), 1, 1), d_s = 0.5)
  y_tilde = torch.clamp(y_tilde, -1, 1)

visualize(y_tilde[0].cpu(), 60)
出力結果は以下の通りです。
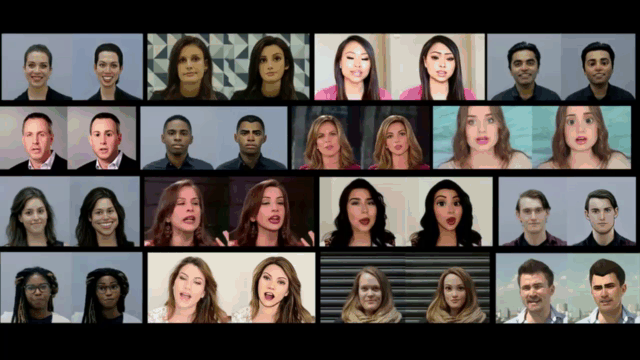
Video Toonification
続いて、動画のToonificationを動かしていきます。
まず、入力動画を以下の通りセットアップしていきます。
video_url = 'https://www.youtube.com/watch?v=gkr57P0fwbI' #@param {type:"string"}

#@markdown 動画の切り抜き範囲(秒)を指定してください。\
#@markdown 30秒以上の場合OOM発生の可能性が高いため注意
start_sec =  30#@param {type:"integer"}
end_sec =  33#@param {type:"integer"}

(start_pt, end_pt) = (start_sec, end_sec)

%cd /content/VToonify

!mkdir -p test_video/frames

download_resolution = 720
full_video_path = '/content/VToonify/data/full_video.mp4'
input_clip_path = '/content/VToonify/data/clip_video.mp4'

# 動画ダウンロード
ydl_opts = {'format': f'best[height<={download_resolution}]', 'overwrites': True, 'outtmpl': full_video_path}
with YoutubeDL(ydl_opts) as ydl:
    ydl.download([video_url])

# 指定区間切り抜き
with VideoFileClip(full_video_path) as video:
    subclip = video.subclip(start_pt, end_pt)
    subclip.write_videofile(input_clip_path)

video_path = './data/clip_video.mp4'
video_cap = cv2.VideoCapture(video_path)
num = int(video_cap.get(7))

success, frame = video_cap.read()
if success == False:
    assert('load video frames error')
frame = cv2.cvtColor(frame, cv2.COLOR_BGR2RGB)
動画をフレーム画像に分割し、フレーム画像ごとにToonificationを実行します。
scale = 1
kernel_1d = np.array([[0.125],[0.375],[0.375],[0.125]])
# We proprocess the video by detecting the face in the first frame,
# and resizing the frame so that the eye distance is 64 pixels.
# Centered on the eyes, we crop the first frame to almost 400x400 (based on args.padding).
# All other frames use the same resizing and cropping parameters as the first frame.
paras = get_video_crop_parameter(frame, landmarkpredictor, padding=[200,200,200,200])
if paras is None:
    print('no face detected!')
else:
    h,w,top,bottom,left,right,scale = paras
    H, W = int(bottom-top), int(right-left)
# for HR video, we apply gaussian blur to the frames to avoid flickers caused by bilinear downsampling
# this can also prevent over-sharp stylization results.
if scale <= 0.75:
    frame = cv2.sepFilter2D(frame, -1, kernel_1d, kernel_1d)
if scale <= 0.375:
    frame = cv2.sepFilter2D(frame, -1, kernel_1d, kernel_1d)
frame = cv2.resize(frame, (w, h))[top:bottom, left:right]

fourcc = cv2.VideoWriter_fourcc(*'mp4v')
videoWriter = cv2.VideoWriter('./output/result.mp4', fourcc, video_cap.get(5), (4*W, 4*H))
batch_size = 4

with torch.no_grad():
    batch_frames = []
    for i in tqdm(range(num)):
        if i == 0:
            I = align_face(frame, landmarkpredictor)
            I = transform(I).unsqueeze(dim=0).to(device)
            s_w = pspencoder(I)
            s_w = vtoonify.zplus2wplus(s_w)
            s_w[:,:7] = exstyle[:,:7]
        else:
            success, frame = video_cap.read()
            frame = cv2.cvtColor(frame, cv2.COLOR_BGR2RGB)
            if scale <= 0.75:
                frame = cv2.sepFilter2D(frame, -1, kernel_1d, kernel_1d)
            if scale <= 0.375:
                frame = cv2.sepFilter2D(frame, -1, kernel_1d, kernel_1d)
            frame = cv2.resize(frame, (w, h))[top:bottom, left:right]

        batch_frames += [transform(frame).unsqueeze(dim=0).to(device)]

        if len(batch_frames) == batch_size or (i+1) == num:
            x = torch.cat(batch_frames, dim=0)
            batch_frames = []
            # parsing network works best on 512x512 images, so we predict parsing maps on upsmapled frames
            # followed by downsampling the parsing maps
            x_p = F.interpolate(parsingpredictor(2*(F.interpolate(x, scale_factor=2, mode='bilinear', align_corners=False)))[0],
                            scale_factor=0.5, recompute_scale_factor=False).detach()
            # we give parsing maps lower weight (1/16)
            inputs = torch.cat((x, x_p/16.), dim=1)
            # d_s has no effect when backbone is toonify
            y_tilde = vtoonify(inputs, s_w.repeat(inputs.size(0), 1, 1), d_s = 0.5)
            y_tilde = torch.clamp(y_tilde, -1, 1)
            for k in range(y_tilde.size(0)):
                videoWriter.write(tensor2cv2(y_tilde[k].cpu()))
videoWriter.release()
video_cap.release()
出力結果は以下の通りです。
まとめ
本記事では、VToonifyを用いて任意の画像・動画にアニメ風スタイルを転送する方法をご紹介しました。
また本記事では、機械学習を動かすことにフォーカスしてご紹介しました。
もう少し学術的に体系立てて学びたいという方には以下の書籍などがお勧めです。ぜひご一読下さい。
リンク
リンク
また動かせるだけから理解して応用できるエンジニアの足掛かりに下記のUdemyなどもお勧めです。
参考文献
1. 論文 - VToonify: Controllable High-Resolution Portrait Video Style Transfer
2. GitHub - williamyang1991/VToonify


0 件のコメント :
コメントを投稿