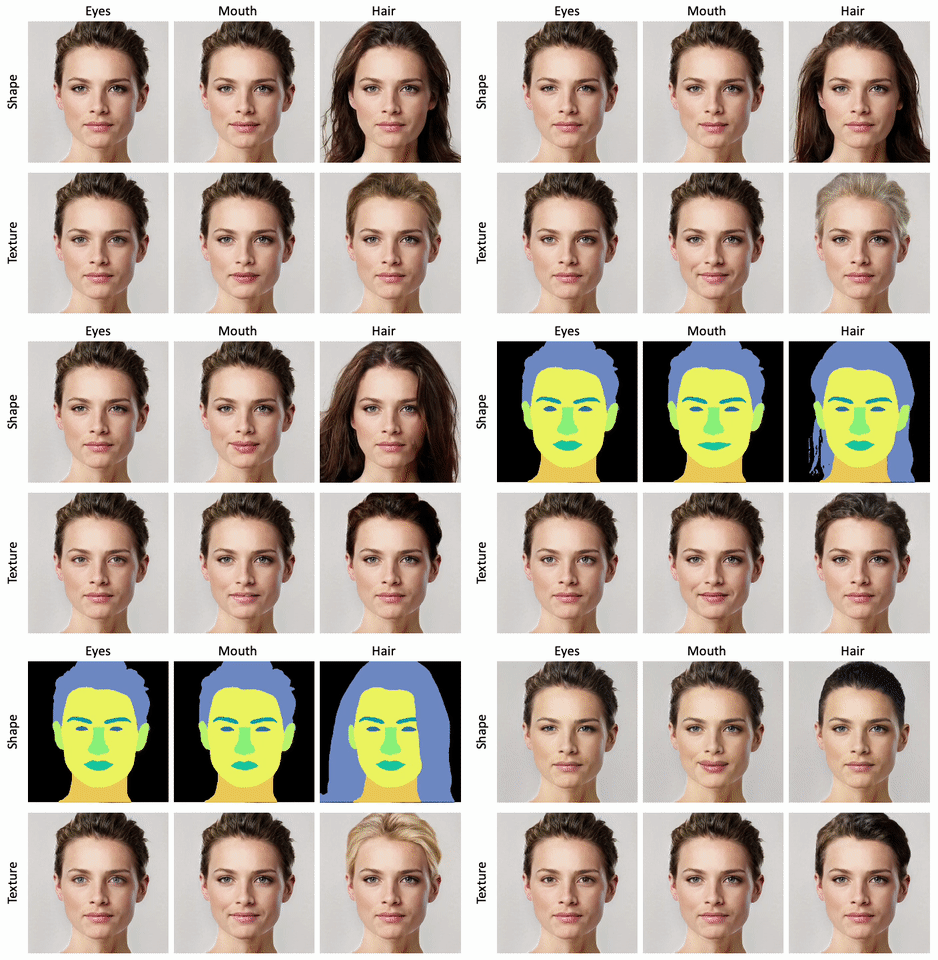
本記事では、SemanticStyleGANを用いて、任意の画像のalign face, invert, Image synthesis, Image editingなどを行う方法をご紹介します。
SemanticStyleGAN
概要
既存技術のStyleGANは、画像の合成(synthesis)や編集(editing)タスクにおいて、優れたパフォーマンスを発揮します。
一方でStyleGANのlatent
codeはグローバルなスタイルを制御するように設計されているため、合成画像のきめ細やかな制御が困難という問題がありました。
SemanticStyleGANでは、ジェネレータがセマンティック領域を個別にモデル化するようにトレーニングされ、様々なローカルパーツとテクスチャは、対応するlatent
codeによってきめ細かに制御され合成的な方法で画像合成を実現しています。
詳細はこちらの論文をご参照ください。
本記事では上記手法を用いて、任意の画像から画像合成・画像編集を行います。
デモ(Colaboratory)
それでは、実際に動かしながら画像合成・画像編集を行います。
ソースコードは本記事にも記載していますが、下記のGitHubでも取得可能です。
GitHub - Colaboratory demo
また、下記から直接Google Colaboratoryで開くこともできます。

また、このデモはPythonで実装しています。
Pythonの実装に不安がある方、Pythonを使った機械学習について詳しく勉強したい方は、以下の書籍やオンライン講座などがおすすめです。
環境セットアップ
それではセットアップしていきます。
Colaboratoryを開いたら下記を設定しGPUを使用するようにしてください。
「ランタイムのタイプを変更」→「ハードウェアアクセラレータ」をGPUに変更
初めにGithubからソースコードを取得します。
%cd /content

!git clone https://github.com/seasonSH/SemanticStyleGAN.git
# for align face
!git clone https://github.com/adamian98/pulse.git
次にライブラリをインストールします。
%cd /content/SemanticStyleGAN

# ninja
!wget https://github.com/ninja-build/ninja/releases/download/v1.8.2/ninja-linux.zip > /dev/null
!sudo unzip ninja-linux.zip -d /usr/local/bin/ > /dev/null
!sudo update-alternatives --install /usr/bin/ninja ninja /usr/local/bin/ninja 1 --force > /dev/null

!pip install -r requirements.txt
最後にライブラリをインポートします。
%cd /content/SemanticStyleGAN

import os
import argparse
import shutil
import numpy as np
import imageio
import time
import torch

from models import make_model
from visualize.utils import generate, cubic_spline_interpolate

from criteria.lpips import lpips
以上で環境セットアップは完了です。
学習済みモデルのセットアップ
続いて学習済みモデルをダウンロードします。
%cd /content/SemanticStyleGAN
!mkdir pretrained

if not os.path.exists('./pretrained/CelebAMask-HQ-512x512.pt'):
  !wget -c https://github.com/seasonSH/SemanticStyleGAN/releases/download/1.0.0/CelebAMask-HQ-512x512.pt \
        -O ./pretrained/CelebAMask-HQ-512x512.pt
if not os.path.exists('./pretrained/BitMoji-512x512.pt'):
  !wget -c https://github.com/seasonSH/SemanticStyleGAN/releases/download/1.0.0/BitMoji-512x512.pt \
        -O ./pretrained/BitMoji-512x512.pt
if not os.path.exists('./pretrained/MetFaces-512x512.pt'):
  !wget -c https://github.com/seasonSH/SemanticStyleGAN/releases/download/1.0.0/MetFaces-512x512.pt \
        -O ./pretrained/MetFaces-512x512.pt
if not os.path.exists('./pretrained/Toonify-512x512.pt'):
  !wget -c https://github.com/seasonSH/SemanticStyleGAN/releases/download/1.0.0/Toonify-512x512.pt \
        -O ./pretrained/Toonify-512x512.pt
-Oの出力先にモデルがダウンロードされます。
Image Synthesis
まず、CelebAMask-HQ-512x512.ptを用いて潜在空間からランダムに画像合成を行っていきます。
%cd /content/SemanticStyleGAN

args = argparse.ArgumentParser()

args.ckpt = './pretrained/CelebAMask-HQ-512x512.pt'
args.outdir = './results/samples'
args.batch = 8
args.sample = 20
args.truncation = 0.7
args.truncation_mean = 10000
args.save_latent = True
args.device = 'cuda'

if os.path.exists(args.outdir):
  shutil.rmtree(args.outdir)
os.makedirs(args.outdir)

print("Loading model ...")
ckpt = torch.load(args.ckpt)
model = make_model(ckpt['args'])
model.to(args.device)
model.eval()
model.load_state_dict(ckpt['g_ema'])
mean_latent = model.style(torch.randn(args.truncation_mean, model.style_dim, device=args.device)).mean(0)

print("Generating images ...")
start_time = time.time()
with torch.no_grad():
  styles = model.style(torch.randn(args.sample, model.style_dim, device=args.device))
  styles = args.truncation * styles + (1-args.truncation) * mean_latent.unsqueeze(0)
  images, segs = generate(model, styles, mean_latent=mean_latent, batch_size=args.batch)
  for i in range(len(images)):
    imageio.imwrite(f"{args.outdir}/{str(i).zfill(6)}_img.jpg", images[i])
    imageio.imwrite(f"{args.outdir}/{str(i).zfill(6)}_seg.jpg", segs[i])
    if args.save_latent:
      np.save(f'{args.outdir}/{str(i).zfill(6)}_latent.npy', styles[i:i+1].cpu().numpy())
print(f"Average speed: {(time.time() - start_time)/(args.sample)}s")
以下のような合成画像とセグメンテーション画像が出力されます。
Image Editing
続いて、先ほど生成した画像を用いて、画像編集を行います。
# 編集箇所のdict
latent_dict_celeba = {
  2:  "bcg_1",
  3:  "bcg_2",
  4:  "face_shape",
  5:  "face_texture",
  6:  "eye_shape",
  7:  "eye_texture",
  8:  "eyebrow_shape",
  9:  "eyebrow_texture",
  10: "mouth_shape",
  11: "mouth_texture",
  12: "nose_shape",
  13: "nose_texture",
  14: "ear_shape",
  15: "ear_texture",
  16: "hair_shape",
  17: "hair_texture",
  18: "neck_shape",
  19: "neck_texture",
  20: "cloth_shape",
  21: "cloth_texture",
  22: "glass",
  24: "hat",
  26: "earing",
  0:  "coarse_1",
  1:  "coarse_2",
}

%cd /content/SemanticStyleGAN

args = argparse.ArgumentParser()

args.ckpt = './pretrained/CelebAMask-HQ-512x512.pt'
args.latent = './results/samples/000000_latent.npy'
args.outdir = './results/videos'
args.batch = 8
args.sample = 10
args.steps = 160
args.truncation = 0.7
args.truncation_mean = 10000
args.dataset_name = 'celeba'
args.device = 'cuda'


if os.path.exists(args.outdir):
  shutil.rmtree(args.outdir)
os.makedirs(args.outdir)

print("Loading model ...")
ckpt = torch.load(args.ckpt)
model = make_model(ckpt['args'])
model.to(args.device)
model.eval()
model.load_state_dict(ckpt['g_ema'])
mean_latent = model.style(torch.randn(args.truncation_mean, model.style_dim, device=args.device)).mean(0)

print("Generating original image ...")
with torch.no_grad():
  if args.latent is None:
    styles = model.style(torch.randn(1, model.style_dim, device=args.device))
    styles = args.truncation * styles + (1-args.truncation) * mean_latent.unsqueeze(0)
  else:
    styles = torch.tensor(np.load(args.latent), device=args.device)
  if styles.ndim == 2:
    assert styles.size(1) == model.style_dim
    styles = styles.unsqueeze(1).repeat(1, model.n_latent, 1)
  images, segs = generate(model, styles, mean_latent=mean_latent, randomize_noise=False)
  imageio.imwrite(f'{args.outdir}/image.jpeg', images[0])
  imageio.imwrite(f'{args.outdir}/seg.jpeg', segs[0])
print("Generating videos ...")
if args.dataset_name == "celeba":
  latent_dict = latent_dict_celeba
else:
  raise ValueError("Unknown dataset name: f{args.dataset_name}")

with torch.no_grad():
  for latent_index, latent_name in latent_dict.items():
    styles_new = styles.repeat(args.sample, 1, 1)
    mix_styles = model.style(torch.randn(args.sample, 512, device=args.device))
    mix_styles[-1] = mix_styles[0]
    mix_styles = args.truncation * mix_styles + (1-args.truncation) * mean_latent.unsqueeze(0)
    mix_styles = mix_styles.unsqueeze(1).repeat(1,model.n_latent,1)
    styles_new[:,latent_index] = mix_styles[:,latent_index]
    styles_new = cubic_spline_interpolate(styles_new, step=args.steps)
    images, segs = generate(model, styles_new, mean_latent=mean_latent, randomize_noise=False, batch_size=args.batch)
    frames = [np.concatenate((img,seg),1) for (img,seg) in zip(images,segs)]
    imageio.mimwrite(f'{args.outdir}/{latent_index:02d}_{latent_name}.mp4', frames, fps=20)
    print(f"{args.outdir}/{latent_index:02d}_{latent_name}.mp4")
顔の様々な部位を編集した結果が以下の通りです。目の細部など細かな制御が実現されています。


任意の画像から画像合成
最後に、任意の画像をモデルの潜在空間にinvertし、生成したlatentから別のモデルを用いて画像合成を行います。
本記事では、こちらのぱくたそ様の画像を使用させていただきます。
まずは、画像を取得し、顔部分の切り取ります。
%cd /content/SemanticStyleGAN
!rm -rf test_img
!mkdir -p test_img/src test_img/align

!wget -c https://www.pakutaso.com/shared/img/thumb/kuchikomi725_TP_V.jpg \
      -O ./test_img/src/test1.jpg

%cd /content/pulse
!python align_face.py \
  -input_dir /content/SemanticStyleGAN/test_img/src \
  -output_dir /content/SemanticStyleGAN/test_img/align \
  -output_size 512 \
  -seed 12 \
続けて、潜在空間にinvertします。
%cd /content/SemanticStyleGAN
!cp visualize/invert.py invert.py

!python invert.py \
  --ckpt pretrained/CelebAMask-HQ-512x512.pt \
  --imgdir test_img/align \
  --outdir results/inversion \
  --size 512
生成したlatentからBitmojiモデルを用いて画像合成します。
%cd /content/SemanticStyleGAN

args = argparse.ArgumentParser()

args.ckpt = './pretrained/BitMoji-512x512.pt'
args.latent = './results/inversion/latent/test1_0.npy'
args.outdir = './results/style_BitMoji'
args.truncation = 0.7
args.truncation_mean = 10000
args.device = 'cuda'

if os.path.exists(args.outdir):
  shutil.rmtree(args.outdir)
os.makedirs(args.outdir)

print("Loading model ...")
ckpt = torch.load(args.ckpt)
model = make_model(ckpt['args'])
model.to(args.device)
model.eval()
model.load_state_dict(ckpt['g_ema'])
mean_latent = model.style(torch.randn(args.truncation_mean, model.style_dim, device=args.device)).mean(0)

print("Generating original image ...")
with torch.no_grad():
  if args.latent is None:
    styles = model.style(torch.randn(1, model.style_dim, device=args.device))
    styles = args.truncation * styles + (1-args.truncation) * mean_latent.unsqueeze(0)
  else:
    styles = torch.tensor(np.load(args.latent), device=args.device)
  if styles.ndim == 2:
    assert styles.size(1) == model.style_dim
    styles = styles.unsqueeze(1).repeat(1, model.n_latent, 1)
  images, segs = generate(model, styles, mean_latent=mean_latent, randomize_noise=False)
  imageio.imwrite(f'{args.outdir}/image.jpeg', images[0])
  imageio.imwrite(f'{args.outdir}/seg.jpeg', segs[0])
出力結果は以下の通りです。
Invertで元画像からやや離れてしまっていますが、BitMojiの画像合成はうまく生成できているようです。
まとめ
本記事では、SemanticStyleGANを用いて画像合成・画像編集を行いました。
Semantic領域を用いて目元や首に至るまで細部の編集が可能になり、ますますオリジナル画像との区別が困難になりそうです。
また本記事では、機械学習を動かすことにフォーカスしてご紹介しました。
もう少し学術的に体系立てて学びたいという方には以下の書籍などがお勧めです。ぜひご一読下さい。
リンク
リンク
また動かせるだけから理解して応用できるエンジニアの足掛かりに下記のUdemyなどもお勧めです。
参考文献
1. 論文 - SemanticStyleGAN: Learning Compositional Generative Priors for Controllable Image Synthesis and Editing
2. GitHub - seasonSH/SemanticStyleGAN


0 件のコメント :
コメントを投稿